Monday, February 28, 2011

Tạo Panel về tác giả kiểu Wordpress

Tạo Panel về tác giả đặt cuối mỗi bài viết sẽ làm tăng brand name cho tác giả bài viết. Chúng ta đã biết cách tạo một Panel như vậy qua bài viết này. Như các bạn để ý ở một số blog viết trên nền Wordpress sẽ thấy Panel về tác giả khá đẹp. Đôi khi blog đó cấp quyền tác giả đăng bài viết cho một số người đăng ký và các tác giả đó đều có Panel giống như Admin của blog. Liệu blogspot có thể có được tính năng này hay không? Câu trả lời là có thể.


Qua bài viết này, tôi sẽ giới thiệu cách tạo một Panel về tác giả có phong cách Wordpress theo các bước như sau.

Bước 1. Đăng nhập Blogger, vào Design >> Edit HTML, chọn Expand Widget Templates.

Tìm đến đoạn code như bên dưới.

<div class='post-footer-line post-footer-line-3'><span class='post-location'>
<b:if cond='data:top.showLocation'>
<b:if cond='data:post.location'>
<data:postLocationLabel/>
<a expr:href='data:post.location.mapsUrl' target='_blank'><data:post.location.name/></a>
</b:if>
</b:if>
</span></div>

Đặt vào sau đoạn code đó bằng đoạn code bên dưới.

<b:if cond='data:blog.pageType == "item"'>
<div class='Post-Author'>
<b>Về tác giả:</b><br/>

<b:if cond='data:post.author == "Tên tác giả"'>
<div id='AUTHOR_1'>
<a href='URL_Hồ sơ_Tác giả là Admin'><b><data:post.author/></b></a>,
<img src='URL_Hình ảnh của Admin'/>
<p>Đoạn text sơ nét về tác giả là Admin</p>
</div>
</b:if>

</div>
</b:if>

Trong đoạn code trên, bạn cần thay Tên tác giả, URL dẫn đến trang hồ sơ hoặc trang giới thiệu về tác giả là Admin, URL hình ảnh của Admin, đoạn text giới thiệu sơ nét về tác giả hoặc về blog.

Bước 2. Đặt đoạn code sau đây vào trước thẻ ]]</b:skin>.

.Post-Author img{
float:left;
margin:4px 7px 0px 0px !important;
-moz-box-shadow:0 0 20px rgba(255, 255, 255, .6);
border:0;
padding:0;
width:98px;
}
.Post-Author{
color:white;
border:1px solid transparent;
padding:10px;
text-align:justify;
-moz-border-radius:6px;
-moz-box-shadow:0 0 30px rgba(255,255,255,.3);
margin:20px auto;
background-image:-moz-linear-gradient(left, rgba(255,255,255,0), rgba(255,255,255,0.2));
background-image:-webkit-gradient(linear,left bottom,right bottom,from(rgba(255,255,255,0)), to(rgba(255,255,255,.2)));
}

Bạn có thể tìm hiểu thêm về CSS để tùy biến đoạn CSS ở trên theo ý muốn của mình.

Lưu Template là OK.

Nếu blogspot của bạn đã cho phép một số người đăng ký đăng bài (cộng tác viên) trên blogspot của bạn, có quyền đăng nhập vào Blogger của bạn để đăng bài viết thì bạn có thể tạo Panel thêm cho các tác giả đó. Ở bước 1, dùng code như sau.

<b:if cond='data:blog.pageType == "item"'>
<div class='Post-Author'>
<b>Về tác giả:</b><br/>

<b:if cond='data:post.author == "Tên tác giả là Admin"'>
<div id='AUTHOR_1'>
<a href='URL_Hồ sơ của tác giả là Admin'><b><data:post.author/></b></a>,
<img src='URL_Hình ảnh của Admin'/>
<p>Đoạn text sơ lược về Admin</p>
</div>
</b:if>

<b:if cond='data:post.author == "Tên Tác giả 2"'>
<div id='AUTHOR_2'>
<a href='URL_Hồ sơ Tác giả 2'><b><data:post.author/></b></a>,
<img src='URL_Hình ảnh Tác giả 2'/>
<p>Đoạn text sơ lược về Tác giả 2</p>
</div>
</b:if>

<b:if cond='data:post.author == "Tên Tác giả 3"'>
<div id='AUTHOR_3'>
<a href='URL_Hồ sơ Tác giả 3'><b><data:post.author/></b></a>,
<img src='URL_Hình ảnh Tác giả 3'/>
<p>Đoạn text sơ lược về Tác giả 3</p>
</div>
</b:if>

</div>
</b:if>

Đến Bước 2, thì có thể thêm định dạng CSS như bên dưới để tạo dáng khác biệt cho Panel của từng tác giả.

#AUTHOR_1{

Đặt các thuộc tính CSS ở đây

}
#AUTHOR_2{

Đặt các thuộc tính CSS ở đây

}
#AUTHOR_3{

Đặt các thuộc tính CSS ở đây

}

Hy vọng bạn có thể linh hoạt vận dụng để có một Panel về tác giả theo ý muốn của mình.

Cách cho hoặc không cho một đoạn CSS hoạt động trên IE

Trong quá trình thiết kế website hoặc webblog, việc chỉ cho một đoạn CSS nào đó hoạt động trên một hay tất cả các phiên bản Internet Explorer (IE) hoặc ẩn đoạn CSS đó không cho nó hoạt động trên các công cụ trình duyệt khác, đôi khi rất là cần thiết. Bài viết này hướng dẫn cụ thể từng trường hợp mà tác giả nhận thấy rất cần cho các blogger.

1. Trường hợp 1: Nếu bạn muốn ngăn chặn tất cả các phiên bản IE không nhìn thấy một đoạn CSS thì bạn sử dụng code như bên dưới. Trường hợp này xảy ra khi một đoạn thuộc tính CSS nào đó (ví dụ đoạn CSS A) không có tác dụng tốt, tức là nó làm cho một ID hay CLASS liên quan không hiển thị tốt trên các trình duyệt IE mà hiển thị tốt trên trình duyệt khác như Firefox, Chrome…

<!--[if !IE]>
-->
<style type="text/css">
Đoạn CSS A đặt ở đây
</style>
<!--
<![endif]-->

Theo chức năng đoạn code trên thì, các công cụ trình duyệt không phải IE (như Firefox) sẽ bỏ qua nội dung giữa dấu <!-- trên dòng 1 và dấu --> trên dòng 2. Chính dấu --> trên dòng 2 đóng phần chú thích ngay trước đoạn CSS đối với các trình duyệt không phải IE và cho phép các trình duyệt đó nhìn thấy đoạn CSS này. Việc mở lại phần chú thích ngay sau đoạn CSS sẽ ẩn đi phần còn lại của phần chú thích điều kiện đối với các trình duyệt không phải IE.

IE sẽ xử lý tất cả nội dung giữa <!--[if !IE]> trên dòng 1 và <![endif]--> trên dòng 7. Việc đặt dấu chấm than ! trước IE trong phần mở khai báo điều kiện sẽ cho các phiên bản trình duyệt IE biết để bỏ qua nội dung giữa <!--[if !IE]> trên dòng 1 và <![endif]--> trên dòng 7. Nếu lượt bỏ dấu chấm than ! trước IE sẽ cho tất cả các phiên bản IE xử lý nội dung bên trong phần khai báo điều kiện. Khi đó sẽ xảy ra trường hợp 2.

2. Trường hợp 2: Nếu bạn muốn đoạn CSS chỉ hoạt động đối với tất cả các phiên bản IE thì sử dụng cú pháp như sau:

<!--[if IE]>
<style type="text/css">
Đoạn CSS A đặt ở đây
</style>
<![endif]-->

Trường hợp này hay dùng khi bạn muốn Favicon trên blogspot hiển thị trên IE, bạn sẽ dùng code như thế này.

<!--[if IE]>
<link href='/favicon.ico' rel='shortcut icon' type='image/x-icon'/>
<![endif]-->
<link href='/favicon.ico' rel='icon' type='image/x-icon'/>

3. Trường hợp 3: Nếu bạn muốn đoạn CSS không hoạt động trên một phiên bản IE (ví dụ IE6) mà vẫn hoạt động trên tất cả các trình duyệt không phải IE thì sử dụng cú pháp như bên dưới.

<!--[if !IE 6]>
<style type="text/css">
Đoạn CSS A đặt ở đây
</style>
<![endif]-->

<!--[if !IE]>
-->
<style type="text/css">
Đoạn CSS A đặt ở đây
</style>
<!--
<![endif]-->

Hoặc muốn gọn hơn thì dùng thế này:

<!--[if !IE 6]>
-->
<style type="text/css">
Đoạn CSS A đặt ở đây
</style>
<!--
<![endif]-->

Hy vọng bạn sẽ tìm thấy ít nhiều sự hữu ích từ thủ thuật này. :0)

Sunday, February 27, 2011

Hiệu ứng M6 cho tiện ích Nhãn

Trang Dhteumeuleu.com có rất nhiều kiểu hiệu ứng rất độc đáo dành cho thiết kế web. Hôm nay xin giới thiệu kiểu menu M6 do Dhteumeuleu.com phát triển. Bạn có thể xem Demo trước khi thực hiện tạo kiểu Menu này.

Bước 1. Đặt đoạn code Javascript dưới đây vào trước thẻ </head>.

<script type="text/javascript">
//<![CDATA[
// ===========================================
// -------- M6 menu ------
// script written by Gerard Ferrandez - Ge-1-doot - December 2005
// http://www.dhteumeuleu.com
// updated Feb 2010 - namespaced
// ===========================================

var M6 = function () {
var P,T;
var over = -1;
var fontSize = 38;
var lensFX = 1;
var num = true;
var color = "#347C17";
var selected = "#800517";
var zoom = function (s) {
if(s!=over){
over = s;
var i = 0,o;
while (o = P[i]) {
o.style.fontSize=Math.floor(fontSize / (Math.abs(i - s) + lensFX) + 3)+"px";
o.style.color=(i==s)?selected:color;
i++;
}
}
}
var init = function () {
P = document.getElementById("menu").getElementsByTagName("a");
var i = 0,o;
while (o = P[i]) {
if(num){
x=i+".";
if(x.length<3)x="0"+x;
o.innerHTML = x+o.innerHTML;
}
o.style.width = "100%";
o.i = i;
o.onmouseover= function() {
zoom(this.i);
}
i++;
}
zoom(0);
}
return {
init : init
}
}();
onload = function() {
M6.init();
}
//]]>
</script>

Bước 2. Đặt đoạn code CSS sau đây vào trước thẻ </head>.

<type type="text/css">
#menu {
height: 300px;
position: relative;
width: 400px;
}
#menu a {
display: block;
font-family: Arial, sans-serif;
text-decoration: none;
white-space: nowrap;
}
</style>

Bước 3. Thiết lập cấu trúc HTML như bên dưới và đặt giữa thân trang web (giữa thẻ <body> và </body>).

<div id="menu">
<a href="URL_Link 1"> Link 1 </a>
<a href="URL_Link 2"> Link 2 </a>
<a href="URL_Link 3"> Link 3 </a>
.......
</div>

* Mở rộng: Ở đây nhận thấy có thể áp dụng hiệu ứng này cho tiện ích Nhãn (Label) trên blogspot. Bạn có thể xem Demo bên dưới.


Để làm được như vậy thì trước tiên Đăng nhập Blogger, vào Design >> Page Elements. Nếu blog của bạn chưa có tiện ích Nhãn (Labels) thì thêm một tiện ích như vậy.

Ở Bước 1, bạn cần thay dòng

P = document.getElementById("menu").getElementsByTagName("a");

Bằng dòng :

P = document.getElementById("Label1").getElementsByTagName("a");

Đến Bước 2 thì đặt code bên dưới vào trước thẻ ]]</b:skin>.

#Label1 {
height:300px;
position:relative;
width:250px;
}
#Label1 li {
list-style-type:none;
margin:0;
padding:0;
}
#Label1 a {
display:block;
font-family:Arial, sans-serif;
text-decoration:none;
white-space:nowrap;
}
#Label1 a:hover {
text-decoration:none;
}

Tùy biến Comments Block cho blogspot

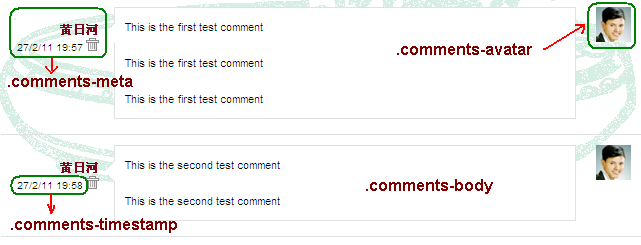
Để có phần nhận xét (Comments) đẹp cho blogspot thì bạn phải tùy biến hai thành phần quan trọng là comments-block và comment-form. Tiếp sau bài hướng dẫn tạo Comment Form đẹp, bài viết này sẽ hướng dẫn cách tạo một Comments Block đẹp.

Bạn có thể xem một ví dụ Demo ở hình minh họa bên dưới.


Nào chúng ta cùng thực hiện theo các bước như sau.

Bước 1. Đăng nhập Blogger, vào Design >> Edit HTML, chọn Expand Widget Templates.

Dùng từ khóa comments-block, tìm đến đoạn code như bên dưới.

<div expr:id='data:widget.instanceId + &quot;_comments-block-wrapper&quot;'>
<dl expr:class='data:post.avatarIndentClass' id='comments-block'>
<b:loop values='data:post.comments' var='comment'>
<dt expr:class='&quot;comment-author &quot; + data:comment.authorClass' expr:id='data:comment.anchorName'>
<b:if cond='data:comment.favicon'>
<img expr:src='data:comment.favicon' height='16px' style='margin-bottom:-2px;' width='16px'/>
</b:if>
<a expr:name='data:comment.anchorName'/>
<b:if cond='data:blog.enabledCommentProfileImages'>
<data:comment.authorAvatarImage/>
</b:if>
<b:if cond='data:comment.authorUrl'>
<a expr:href='data:comment.authorUrl' rel='nofollow'><data:comment.author/></a>
<b:else/>
<data:comment.author/>
</b:if>
<data:commentPostedByMsg/>
</dt>
<dd class='comment-body' expr:id='data:widget.instanceId + data:comment.cmtBodyIdPostfix'>
<b:if cond='data:comment.isDeleted'>
<span class='deleted-comment'><data:comment.body/></span>
<b:else/>
<p>
<data:comment.body/>
</p>
</b:if>
</dd>
<dd class='comment-footer'>
<span class='comment-timestamp'>
<a expr:href='data:comment.url' title='comment permalink'>
<data:comment.timestamp/>
</a>
<b:include data='comment' name='commentDeleteIcon'/>
</span>
</dd>
</b:loop>
</dl>
</div>

Thay toàn bộ đoạn code trên bằng đoạn code bên dưới.

<div id='comments-block1'>
<b:loop values='data:post.comments' var='comment'>
<div class='comments-block'>
<div class='comments-wrapper'>
<div expr:class='&quot;comment-author &quot; + data:comment.authorClass' expr:id='data:comment.anchorName'>
<div class='comments-avatar'>
<b:if cond='data:blog.enabledCommentProfileImages'>
<data:comment.authorAvatarImage/>
</b:if>
</div>

<div class='comments-meta'>
<strong>
<a expr:name='data:comment.anchorName'/>
<b:if cond='data:comment.authorUrl'>
<a class='comments-autor-name' expr:href='data:comment.authorUrl' rel='nofollow'><data:comment.author/></a>
<b:else/>
<a class='comments-autor-name'> <data:comment.author/></a>
</b:if>
</strong>
<div class='comments-timestamp'>
<span class='comment-timestamp'>
<a class='comment-permalink'><data:comment.timestamp/></a>
<b:include data='comment' name='commentDeleteIcon'/>
</span>
</div>
</div>

<div class='comments-body'>
<b:if cond='data:comment.isDeleted'>
<span class='deleted-comment'><data:comment.body/></span>
<b:else/>
<div class='arrow'></div>
<p><data:comment.body/></p>
</b:if>
</div>
</div>
</div>
</div>
</b:loop>
</div>

Bước 2. Đặt code CSS bên dưới vào trước dòng ]]</b:skin>.

(Lưu ý trước khi thực hiện Bước 2, hãy dùng từ khoá comments tìm đến code CSS liên quan rồi xóa hết)

#comments-block1 {padding-left:10px}
.comments h4{padding:10px 0 20px 0}
.comments-wrapper{border-bottom:1px solid #e1e1e1;margin-bottom:10px}
.comments-wrapper:last-child{border-bottom:none}
.comments-block{padding:0 10px}
.comments-meta{font-size:.857em;text-align:right;line-height:1.286em;width:98px;float:left;padding-top:16px}
.comments-meta a:hover{text-decoration:none;border-bottom:1px dotted #004A80}
.comments-timestamp{font-size:.857em}
.comments-avatar{float:right}
.comments-body{font-size:0.857em;background:#FFF;margin:10px 0 15px 113px;border:1px solid #E1E1E1;-moz-border-radius:5px;-webkit-border-radius:5px;padding:10px;width:400px}
.comments-body .arrow{width:0;height:0;line-height:0;float:left;margin:5px 0 0 -20px;border-bottom:10px solid transparent;border-right:10px solid #fff;border-top:10px solid transparent}
.comments-body a{border-bottom:1px dotted #004A80}
.comments-body a:hover{text-decoration:none;border-bottom:1px solid #004A80}

Chú ý trong đoạn code trên, điều chỉnh width:400px để định chiều rộng phần thân chứa nội dung nhận xét phù hợp với chiều rộng phần comments-block.

Lưu Template là OK.

Bạn hãy nghiên cứu thêm về CSS để tùy biến cho phần Comments Block theo ý muốn của mình nhé.
:44)

Saturday, February 26, 2011

Tùy biến Comment Form sao cho đẹp

Trong quá trình chăm chút cho blogspot, một admin bao giờ cũng muốn cho phần nhận xét trên blog của mình thật đẹp. Tuy nhiên để thỏa ước muốn đó thì cũng không phải dễ dàng gì nếu admin không hiểu tường tận về hệ thống nhận xét của Blogger.

Phần nhận xét của một blogspot được đặt nằm gọn trong id có tên là #comments chứa các id và class khác, trong đó có hai id chính là #comments-block và #comment-form. Bạn không nên nhầm mà đồng nhất #comment-form với #comments bởi vì #comment-form là một bộ phận của #comments mà thôi. Tôi sẽ đề cập đến phần #comments-block trong một bài viết khác, trong phạm vi bài này, chỉ xin giải quyết vấn đề làm sao để có một Comment Form cho đẹp.

Dưới đây là phân tích cấu trúc một Comment Form cơ bản chưa được chỉnh sửa gì nhiều.


Như các bạn thấy thì id #comment-form chứa 2 id khác quan trọng gồm #comment-post-message (dòng thông báo Đăng một nhận xét) và #comment-editor (khung nhập nhận xét). Để hiểu sâu hơn, chúng ta tiếp tục phân tích phần XML trong Template của Comment Form.

Đăng nhập Blogger, vào Design >> Edit HTML, chọn Expand Widget Templates.

Dùng từ khóa comment-form tìm đến đoạn code như bên dưới.

<b:includable id='comment-form' var='post'>
<div id='comment-form'>
<a name='comment-form'/>
<h4 id='comment-post-message'><data:postCommentMsg/></h4>
<p><data:blogCommentMessage/></p>
<data:blogTeamBlogMessage/>
<a expr:href='data:post.commentFormIframeSrc' id='comment-editor-src'/>
<iframe allowtransparency='true' class='blogger-iframe-colorize blogger-comment-from-post' frameborder='0' height='410' id='comment-editor' name='comment-editor' src='' width='100%'/>
<data:post.friendConnectJs/>
<data:post.cmtfpIframe/>
<script type='text/javascript'>
BLOG_CMT_createIframe(&#39;<data:post.appRpcRelayPath/>&#39;, &#39;<data:post.communityId/>&#39;);
</script>
</div>
</b:includable>

Chú ý trên đoạn code trên, đối với một số Template thì bạn sẽ thấy thẻ <div class='comment-form'>, thay vì là thẻ <div id='comment-form'>.

Nào, chúng ta bắt đầu tùy biến bằng CSS nhé.

1. Nếu bạn muốn tùy biến dòng thông báo Đăng một nhận xét thì bạn đặt CSS như sau.

#comment-post-message {
float:left;
font-size:14px;
font-family:Arial;
font-weight:bold;
border:1px solid #fc5604;
color: #0000ff;
text-case:sentence;
}

Chú ý text-transform:uppercase đặt chữ viết HOA, còn text-case:sentence đặt chữ viết Hoa chữ cái đầu.
Nếu bạn rành về CSS thì có thể tùy ý điều chỉnh theo ý muốn.
Nếu bạn muốn id này float về giữa thì đặt float:center;
Nếu muốn ẩn quách nó đi thì đặt thêm display:none !important;
Còn nếu muốn xóa luôn nó đi thì (trong Template) xóa dòng <h4 id='comment-post-message'><data:postCommentMsg/></h4>
Nếu muốn thay đổi dòng Đăng một nhận xét thì thay <data:postCommentMsg/> bằng câu gì đó bạn muốn.

2. Nếu để ý phần #comment-editor bạn sẽ thấy bề ngang nó cách xa biên bên phải của phần Main và bề dọc nó cách xa phần #blog-pager làm cho nó trông rất xấu xí, vì chừa đất trống rất nhiều mà chẳng biết “trồng” cái gì vào đấy. Để cắt phần đất thừa đó đi thì bạn tùy biến CSS cho phần #comment-editor như sau.

#comment-editor{
width:580px;
height:240px;
padding-left:10px;
}

Ở đây bạn chỉnh các thông số về chiều rộng (width) sao cho không quá bề rộng phần Main, chiều cao (height) sao cho tương xứng và padding-left phù hợp với trang của bạn.

3. Ngoài ra bạn có thể tùy biến CSS cho cả id #comment-form như sau.

#comment-form {
background: ;
}
#comment-form p {
………
}

Bạn có thể đặt nền (background) cho phần Comment Form và thêm CSS khác vào đoạn code trên.

Đối với Template có thẻ <div class='comment-form'> thì thay #comment-form bằng .comment-form

Và còn nhiều thứ khác nữa có thể tùy biến xung quanh Comment Form, hy vọng có thể cập nhật tiếp trong thời gian tới. :1)

Friday, February 25, 2011

Tiện ích Phim mới nhất cho blogspot về phim

Đối với các blogspot chuyên về phim, sau khi sử dụng thủ thuật tạo Readmore tự động riêng cho blog kiểu này thì thủ thuật cần thiết kế đến phải là tiện ích Phim mới nhất (Recent Videos/Recent Films).

Bạn có thể xem Demo cho tiện ích kiểu như vậy tại trang này.

Để cài đặt tiện ích này, bạn hãy thực hiện như sau.

Bước 1. Đăng nhập Blogger, vào Design >> Edit HTML.

Đặt đoạn code sau đây vào trước thẻ </head>.

<style type='text/css'>
img.recent_thumb {
border:0 none;
float:left;
height:90px;
margin:0 10px 10px 0px;
width:120px;
}
img.recent_thumb:hover {
filter: alpha(opacity:0.7);
KHTMLOpacity: 0.7;
MozOpacity: 0.7;
-khtml-opacity:.70;
-ms-filter:&quot;alpha(opacity=70)&quot;;
-moz-opacity:.70;
filter:alpha(opacity=70);
opacity:.70;
}
.recent_video_title {
font-size:12px;
font-weight:bold;
margin-bottom:-15px;
padding-left:130px;
}

.recent_video_desc {
font-family:verdana;
font-size:10px;
line-height:15px;
margin-bottom:-10px;
padding-left:130px;
}
.recent_video_footer {
color:#999999;
font-family:verdana;
font-size:10px;
padding-left:130px;
}
.recent_posts_with_thumbs {
float: left;
width: 100%;
min-height: 70px;
margin: 5px 0px 5px 0px;
padding: 0;
font-size:12px;
}
ul.recent_posts_with_thumbs li {
background:transparent url(http://i1091.photobucket.com/albums/i393/Sc0ttyN/play2.png) no-repeat scroll 0 5px;
min-height:90px;
padding-bottom:10px;
padding-top:10px;
}
.recent_posts_with_thumbs a {
text-decoration:none;
}
.recent_posts_with_thumbs strong {
font-size:10px;
}
</style>

<script style="text/javascript">
//<![CDATA[
function showrecentpostswiththumbs(json) {
document.write('<ul class="recent_posts_with_thumbs">');
for (var i = 0; i < numposts; i++) {
var entry = json.feed.entry[i];
var posttitle = entry.title.$t;
var posturl;if (i == json.feed.entry.length) break;
for (var k = 0; k < entry.link.length;k++){
if(entry.link[k].rel=='replies'&&entry.link[k].type=='text/html'){
var commenttext=entry.link[k].title;
var commenturl=entry.link[k].href;
}
if (entry.link[k].rel == 'alternate') {
posturl = entry.link[k].href;break;
}
}
if("content"in entry){
var postcontent=entry.content.$t;
}
var vidid = postcontent.substring(postcontent.indexOf("http://www.youtube.com/watch?v=")+31,postcontent.indexOf("endofvid"));


try {thumburl='http://i2.ytimg.com/vi/'+vidid+'/default.jpg';}catch (error){
thumburl='http://goo.gl/aVYDz';
}
var postdate = entry.published.$t;
var cdyear = postdate.substring(0,4);
var cdmonth = postdate.substring(5,7);
var cdday = postdate.substring(8,10);
var monthnames = new Array();
monthnames[1] = "Jan";monthnames[2] = "Feb";monthnames[3] = "Mar";monthnames[4] = "Apr";monthnames[5] = "May";monthnames[6] = "Jun";monthnames[7] = "Jul";monthnames[8] = "Aug";monthnames[9] = "Sep";monthnames[10] = "Oct";monthnames[11] = "Nov";monthnames[12] = "Dec";
document.write('<li class="clearfix">');

if(showpostthumbnails==true)
document.write('<a href="'+ posturl + '"><img class="recent_thumb" src="'+thumburl+'"/></a>');
document.write('<div class="recent_video_title"><a href="'+posturl+'" target ="_top">'+posttitle+'</a></div><br>');
var textinside = postcontent.substring(postcontent.indexOf("[starttext]")+11,postcontent.indexOf("[endtext]"));
var re = /<\S[^>]*>/g;
postcontent = textinside.replace(re, "");


if (showpostsummary == true) {

if (postcontent.length < numchars) {
document.write('<div class="recent_video_desc">');
document.write(postcontent);
document.write('</div>');}
else {
document.write('<div class="recent_video_desc">');
postcontent = postcontent.substring(0, numchars);
var quoteEnd = postcontent.lastIndexOf(" ");
postcontent = postcontent.substring(0,quoteEnd);
document.write(postcontent + '...');
document.write('</div>');}
}

var towrite='';var flag=0;
document.write('<br><div class="recent_video_footer">');

if(showpostdate==true) {towrite=towrite+monthnames[parseInt(cdmonth,10)]+' '+cdday+' , '+cdyear;flag=1;}

if(showcommentnum==true)
{
if (flag==1) {towrite=towrite+' | ';}
if(commenttext=='1 Comments') commenttext='1 nhận xét';
if(commenttext=='0 Comments') commenttext='Chưa có nhận xét';
commenttext = '<a href="'+commenturl+'" target ="_top">'+commenttext+'</a>';
towrite=towrite+commenttext;
flag=1;
;
}

document.write(towrite);

document.write('</div></li>');
if(displayseparator==true)
if (i!=(numposts-1))
document.write('<hr size=0.5>');

}document.write('</ul>');

}
//]]>
</script>

Lưu Template.

Bước 2. Vào Page Elements. Trên sidebar thêm một tiện ích HTML/Javascript, đặt tiêu đề tiện ích là Phim mới nhất hoặc theo ý thích của bạn, ở phần nội dung tiện ích thì đặt vào bằng đoạn code bên dưới.

<script style="text/javascript">
var numposts = 5; // Thay số 5 bằng số bài viết muốn hiển thị
var showpostthumbnails = true; // Thay true bằng false nếu không muốn hiện thumbnail
var displaymore = true;
var displayseparator = true;
var showcommentnum = true;
var showpostdate = true;
var showpostsummary = true;
var numchars = 50;
</script>
<script src="/feeds/posts/default?orderby=published&alt=json-in-script&callback=showrecentpostswiththumbs"></script>
<div class="clear"/></div>

Nếu bạn muốn áp dụng tiện ích này cho một nhãn nào đó thì thay dòng được đánh dấu màu đỏ bằng dòng bên dưới.

<script src="/feeds/posts/default/-/Tên nhãn?orderby=published&alt=json-in-script&callback=showrecentpostswiththumbs"></script>

Thay Tên nhãn bằng nhãn mà bạn muốn áp dụng tiện ích.

Nguồn tham khảo: Xem >>

Thursday, February 24, 2011

Tạo Auto Readmore cho blog chuyên về phim

Đối với các blogspot chuyên giới thiệu về phim hay video được upload lên hoặc lấy từ Youtube.com thì để có được chế độ Readmore tự động lấy hình đại diện cho youtube video và đoạn trích dẫn thì cần phải sử dụng thủ thuật riêng chứ không dùng script tạo Auto Readmore cho các blog thông thường được.

Bạn có thể xem một ví dụ về một blogspot như vậy tại đây.

Để thực hiện thủ thuật này, bạn hãy thực hiện như sau.

Bước 1. Đăng nhập Blogger, vào Design >> Edit HTML, chọn Expand Widget Templates.

Đặt đoạn code bên dưới vào trước thẻ </head>.

<script type='text/javascript'><!--//--><![CDATA[//><!--
var thumbnail_mode = 'float' ; summary_noimg = 50; summary_img = 50; img_thumb_height = 120; img_thumb_width = 192;


function createVideoThumb(pID){
var div = document.getElementById(pID);
var summ = summary_noimg;
if (div.innerHTML.indexOf("http://www.youtube.com/watch?v=")!=-1){
var vidid = div.innerHTML.substring(div.innerHTML.indexOf("http://www.youtube.com/watch?v=")+31,div.innerHTML.indexOf("endofvid"));
}else {var vidid =""};

var postlink = div.innerHTML.substring(div.innerHTML.indexOf("[postlink]")+10,div.innerHTML.indexOf("[/postlink]"));
if (vidid ==""){var imgvid ='<a href="'+ postlink + '"><img class="thumbnail" src="http://i195.photobucket.com/albums/z105/dantearaujo/novideo.png" width="'+img_thumb_width+'px" height="'+img_thumb_height+'px"/></a>';
}else{
var imgvid ='<a href="'+ postlink + '"><img class=thumbnail src="http://i2.ytimg.com/vi/'+vidid+'/default.jpg" width="'+img_thumb_width+'px" height="'+img_thumb_height+'px"/></a>';
};

var summary = imgvid ;
div.innerHTML = summary;
}

function createVideoThumb2(pID){
var div = document.getElementById(pID);
var imgtag = "";
var summ = summary_noimg;
if (div.innerHTML.indexOf("http://www.youtube.com/watch?v=")!=-1){
var vidid = div.innerHTML.substring(div.innerHTML.indexOf("http://www.youtube.com/watch?v=")+31,div.innerHTML.indexOf("endofvid"));
}else {var vidid =""};

var textinside = div.innerHTML.substring(div.innerHTML.indexOf("[starttext]")+11,div.innerHTML.indexOf("[endtext]"));
var postlink = div.innerHTML.substring(div.innerHTML.indexOf("[postlink]")+10,div.innerHTML.indexOf("[/postlink]"));
var embedvid = "";
if (vidid!="") {
embedvid = '<object width="654" height="393"><param name="movie" value="http://www.youtube.com/v/'+ vidid + '&hl=en&fs=1&rel=0&autoplay=1"></param><param name="allowFullScreen" value="true"></param><param name="allowscriptaccess" value="always"></param><embed src="http://www.youtube.com/v/'+ vidid + '&hl=en&fs=1&rel=0&autoplay=1" type="application/x-shockwave-flash" allowscriptaccess="always" allowfullscreen="true" width="654" height="393"></embed></object>'
}
var summary = embedvid + '<div class="content">' + textinside + '</div>';
div.innerHTML = summary;
}

//--><!]]></script>

Trong đoạn code trên, bạn có thể điều chỉnh các con số trong phần code được đánh dấu màu đỏ, lần lượt là số ký tự khi không có ảnh đại diện, số ký tự khi có ảnh đại diện, chiều cao ảnh đại diện, chiều rộng ảnh đại diện (px).

Bước 2. Tìm dòng code <data:post.body/> (hoặc <p><data:post.body/></p>) và thay nó bằng đoạn code bên dưới.

<div expr:id='&quot;summary&quot; + data:post.id'>[postlink]<data:post.url/>[/postlink]<data:post.body/></div>
<b:if cond='data:blog.pageType == &quot;item&quot;'>
<script type='text/javascript'>createVideoThumb2(&quot;summary<data:post.id/>&quot;);</script>
</b:if>
<b:if cond='data:blog.pageType != &quot;item&quot;'>
<script type='text/javascript'>createVideoThumb(&quot;summary<data:post.id/>&quot;);</script>
</b:if>
<b:if cond='data:blog.pageType != &quot;item&quot;'>
<b:if cond='data:post.title'>
<h3 class='post-title entry-title'>
<b:if cond='data:post.link'>
<a expr:href='data:post.link'><data:post.title/></a>
<b:else/>
<b:if cond='data:post.url'>
<a expr:href='data:post.url'><data:post.title/></a>
<b:else/>
<data:post.title/>
</b:if>
</b:if>
</h3>
</b:if>
</b:if>

Bước 3. Để đăng youtube video lên blogspot trong trường hợp này thì bạn phải tạo tài khoản Youtube trên Youtbube.com hoặc nếu không thì bạn có thể tìm trên Youtube.com để lấy URL nguồn cho video. Để lấy URL, khi bạn xem một video nào đó trên Youtube.com hãy nhấp vào nút Share rồi copy URL trong khung. Bên dưới là một ví dụ.

http://www.youtube.com/watch?v=7g6jc_9OzhI

Bước 4. Trong bảng điều khiển Blogger, vào Settings (Cài đặt) >> Formatting (Định dạng), kéo xuống khung Post Template (Mẫu bài đăng) rồi dán đoạn mẫu sau đây vào khung Post Template.

endofvid
[starttext]
Nội dung bài đăng đặt ở đây
[endtext]

Nhấp SAVE SETTINGS để lưu cài đặt.

Trong đoạn mẫu ở trên thì, "endofvid" được dùng để cho Template hiểu rằng URL video hoàn thành, để bạn dán URL video ngay trước nó mà không có khoảng cách. [starttext] và [endtext] là các phần bao nội dung bài viết, nếu bạn cần viết mô tả nội dung video thì đặt vào giữa hai dòng này.

Bước 5. Vào Posting (Đăng bài) ở chế độ Compose. Trong phần nội dung, bạn đặt URL của video vào trước dòng endofvid, phần nội dung bài đăng thì đặt vào giữa 2 dòng [starttext] và [endtext]. Bên dưới là hình minh họa.


Lưu ý thủ thuật này chỉ áp dụng cho video được upload lên hoặc lấy từ Youtube.com.

Nguồn tham khảo: Xem >>