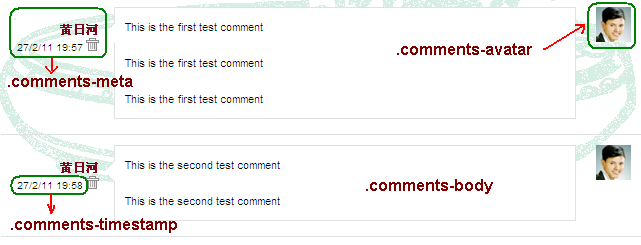
Bạn có thể xem một ví dụ Demo ở hình minh họa bên dưới.
Nào chúng ta cùng thực hiện theo các bước như sau.
Bước 1. Đăng nhập Blogger, vào Design >> Edit HTML, chọn Expand Widget Templates.
Dùng từ khóa comments-block, tìm đến đoạn code như bên dưới.
<div expr:id='data:widget.instanceId + "_comments-block-wrapper"'>
<dl expr:class='data:post.avatarIndentClass' id='comments-block'>
<b:loop values='data:post.comments' var='comment'>
<dt expr:class='"comment-author " + data:comment.authorClass' expr:id='data:comment.anchorName'>
<b:if cond='data:comment.favicon'>
<img expr:src='data:comment.favicon' height='16px' style='margin-bottom:-2px;' width='16px'/>
</b:if>
<a expr:name='data:comment.anchorName'/>
<b:if cond='data:blog.enabledCommentProfileImages'>
<data:comment.authorAvatarImage/>
</b:if>
<b:if cond='data:comment.authorUrl'>
<a expr:href='data:comment.authorUrl' rel='nofollow'><data:comment.author/></a>
<b:else/>
<data:comment.author/>
</b:if>
<data:commentPostedByMsg/>
</dt>
<dd class='comment-body' expr:id='data:widget.instanceId + data:comment.cmtBodyIdPostfix'>
<b:if cond='data:comment.isDeleted'>
<span class='deleted-comment'><data:comment.body/></span>
<b:else/>
<p>
<data:comment.body/>
</p>
</b:if>
</dd>
<dd class='comment-footer'>
<span class='comment-timestamp'>
<a expr:href='data:comment.url' title='comment permalink'>
<data:comment.timestamp/>
</a>
<b:include data='comment' name='commentDeleteIcon'/>
</span>
</dd>
</b:loop>
</dl>
</div>
Thay toàn bộ đoạn code trên bằng đoạn code bên dưới.
<div id='comments-block1'>
<b:loop values='data:post.comments' var='comment'>
<div class='comments-block'>
<div class='comments-wrapper'>
<div expr:class='"comment-author " + data:comment.authorClass' expr:id='data:comment.anchorName'>
<div class='comments-avatar'>
<b:if cond='data:blog.enabledCommentProfileImages'>
<data:comment.authorAvatarImage/>
</b:if>
</div>
<div class='comments-meta'>
<strong>
<a expr:name='data:comment.anchorName'/>
<b:if cond='data:comment.authorUrl'>
<a class='comments-autor-name' expr:href='data:comment.authorUrl' rel='nofollow'><data:comment.author/></a>
<b:else/>
<a class='comments-autor-name'> <data:comment.author/></a>
</b:if>
</strong>
<div class='comments-timestamp'>
<span class='comment-timestamp'>
<a class='comment-permalink'><data:comment.timestamp/></a>
<b:include data='comment' name='commentDeleteIcon'/>
</span>
</div>
</div>
<div class='comments-body'>
<b:if cond='data:comment.isDeleted'>
<span class='deleted-comment'><data:comment.body/></span>
<b:else/>
<div class='arrow'></div>
<p><data:comment.body/></p>
</b:if>
</div>
</div>
</div>
</div>
</b:loop>
</div>
Bước 2. Đặt code CSS bên dưới vào trước dòng ]]</b:skin>.
(Lưu ý trước khi thực hiện Bước 2, hãy dùng từ khoá comments tìm đến code CSS liên quan rồi xóa hết)
#comments-block1 {padding-left:10px}
.comments h4{padding:10px 0 20px 0}
.comments-wrapper{border-bottom:1px solid #e1e1e1;margin-bottom:10px}
.comments-wrapper:last-child{border-bottom:none}
.comments-block{padding:0 10px}
.comments-meta{font-size:.857em;text-align:right;line-height:1.286em;width:98px;float:left;padding-top:16px}
.comments-meta a:hover{text-decoration:none;border-bottom:1px dotted #004A80}
.comments-timestamp{font-size:.857em}
.comments-avatar{float:right}
.comments-body{font-size:0.857em;background:#FFF;margin:10px 0 15px 113px;border:1px solid #E1E1E1;-moz-border-radius:5px;-webkit-border-radius:5px;padding:10px;width:400px}
.comments-body .arrow{width:0;height:0;line-height:0;float:left;margin:5px 0 0 -20px;border-bottom:10px solid transparent;border-right:10px solid #fff;border-top:10px solid transparent}
.comments-body a{border-bottom:1px dotted #004A80}
.comments-body a:hover{text-decoration:none;border-bottom:1px solid #004A80}
Chú ý trong đoạn code trên, điều chỉnh width:400px để định chiều rộng phần thân chứa nội dung nhận xét phù hợp với chiều rộng phần comments-block.
Lưu Template là OK.
Bạn hãy nghiên cứu thêm về CSS để tùy biến cho phần Comments Block theo ý muốn của mình nhé.
:44)

No comments:
Post a Comment